A Windows 11 VM that installs itself, and the 24H2 change that broke it
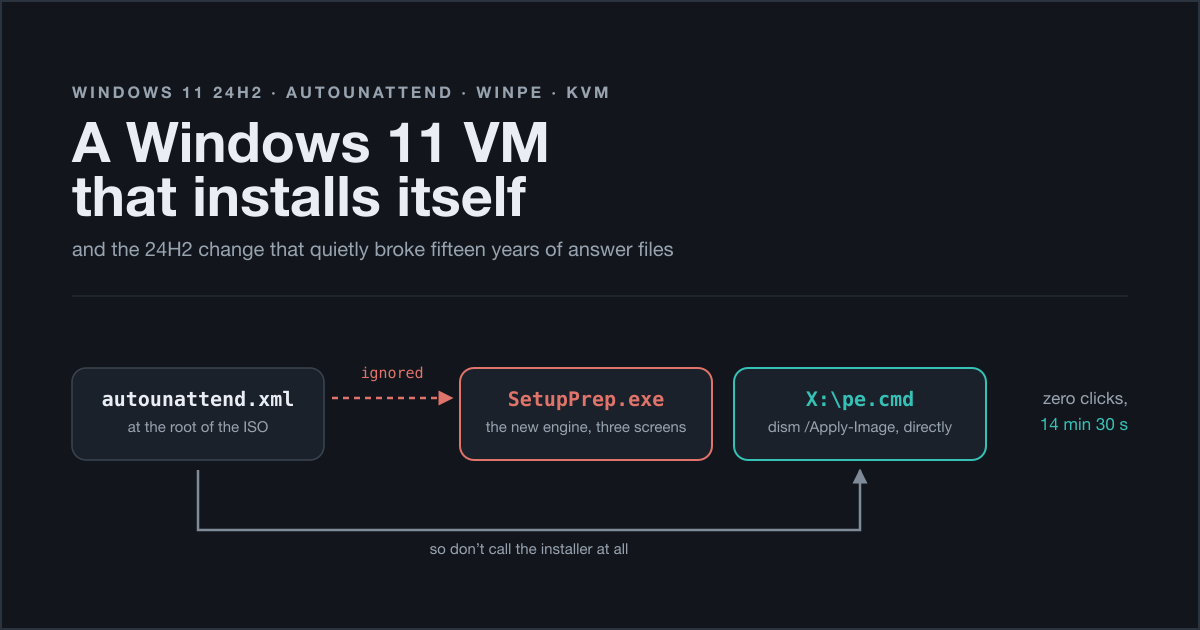
I wanted a Windows 11 VM to install itself. No console, no mouse, no “next, next, I accept” — hand the hypervisor a disk and an ISO, come back later, find a working desktop. The same Beckhoff industrial PC running TwinCAT Linux RT I keep writing about (firewall edition), KVM and libvirt underneath.
So I built a second guest as a practice ground: provisioned, thrown away and provisioned again until the procedure is genuinely one hundred per cent automated — not “automated except for four clicks at the start”, which is where every previous attempt of mine had landed. Two targets that have to hold together: reproducible indefinitely, and robust enough that somebody who does not know libvirt, answer-file schemas and the internals of Windows Setup can run it and get the same machine. An automation that only works when I am driving it is not automation, it is a habit with a script attached.
Being a throwaway, it is deliberately lean: two vCPUs, 4 GB of RAM, no GPU or USB passthrough — which also leaves the hardware the production VM owns exclusively alone while I destroy and rebuild this one all afternoon.
This is a solved problem. It has been solved since roughly 2007. You write an autounattend.xml, you put it where Setup will find it, and Windows installs itself. I have done it before. I expected an afternoon.
It took two days. The first went almost entirely on a single screen that refused to go away, for a reason that has nothing to do with virtualisation, nothing to do with my XML, and everything to do with a change Microsoft shipped in Windows 11 24H2.
The screen that would not go away
The failure mode was as boring as it was total. Boot the VM, watch the Windows logo, and then: Select language settings. Followed by Select keyboard settings. Followed by the product key screen. Three human decisions, on a machine that was supposed to be making none.
So I did what you do. I moved the file.
I put autounattend.xml on a separate SATA CD-ROM. Same screen. I put it on a fixed USB disk. Same screen. I tried a virtual floppy, which on an OVMF + q35 machine is essentially a historical re-enactment — there is no floppy controller to speak of. Same screen. I attached it as a USB CD-ROM, with removable='on' set on the libvirt target so the guest would categorically see it as removable media. Same screen.
Then I stopped guessing and started verifying. Windows Setup drops you into WinPE, WinPE has a command prompt at Shift+F10, and that prompt has diskpart and dir — enough to answer the only question that mattered: is the file actually there?
It was. On every medium. Present, readable, with the same SHA256 as the file I had written on the host. Not a mount problem, not a filesystem problem, not a truncation problem, not a case problem. The file was sitting exactly where the documentation says Setup looks, and Setup was walking straight past it.
The last attempt was the one that should have been unarguable: put the file at the root of the installation ISO itself. Microsoft’s own documentation lists that location in the implicit search order — the drive Setup is running from, at the root. If any location works, that one works.
Same screen.
The clue was which half worked
Here is the detail that cracked it.
When the answer file was on the root of the installation ISO, the rest of it worked. Not some of it — all of it. Once I had clicked through those first screens by hand, the machine name was applied. The local account was created. Autologon happened. FirstLogonCommands ran and installed the VirtIO guest tools silently. Everything in the specialize and oobeSystem passes behaved exactly as written.
Only the very first pass — windowsPE, the one that decides whether you see those GUI screens at all — was being ignored.
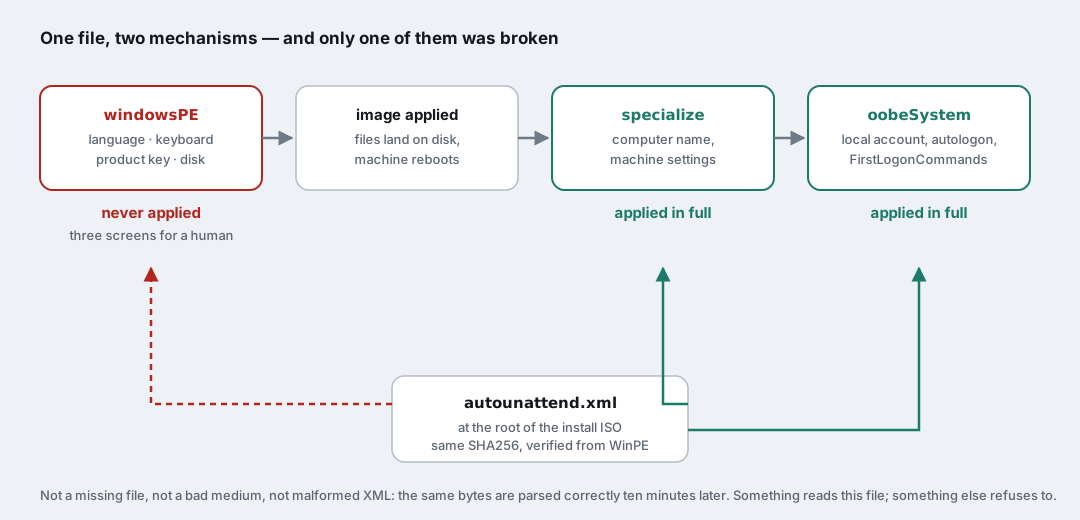
That asymmetry rules out an entire category of explanations: not a missing file, not an unreadable medium, not malformed XML, not the wrong namespace, because the same file on the same medium is parsed and applied correctly ten minutes later.
Two mechanisms, not one. And only one of them was broken.
The search order is still documented. It is just no longer true.
Microsoft’s Windows Setup Automation Overview documents an implicit search order for answer files: eight locations, in descending priority. A value in the registry. %WINDIR%\Panther. Removable read/write media in drive-letter order. Removable read-only media in drive-letter order. And, at the bottom of the list, lowest priority but perfectly valid: the root of the drive Setup is running from.
On paper, my last attempt could not fail. On the machine, it failed every time.
The explanation took an evening of Microsoft Learn plus forum threads — Windows 11 Forum, NTLite, Microsoft Q&A, all describing my exact symptom in slightly different words: Windows 11 24H2 changed what setup.exe actually is.
setup.exe used to be the installer
In Windows 7, 8.1, 10 and the early builds of Windows 11, X:\sources\setup.exe was the installation engine. It started, it looked for an answer file following that documented search order, and if it found one with valid windowsPE settings it skipped the language, keyboard and product key screens entirely and went straight to work. One program, one search, one behaviour, for about fifteen years.
In 24H2 it is a stub
Starting with 24H2 — the build I was installing was 10.0.26100.x, squarely in scope, and the restriction reportedly extends further in 25H2 — setup.exe became a small launcher. Its job is to decide whether you get the legacy engine or the new one: SetupHost.exe, which in turn runs SetupPrep.exe. The community has taken to calling this new engine ConX, and everyone who has poked at it describes it the same way: fussy about answer files.
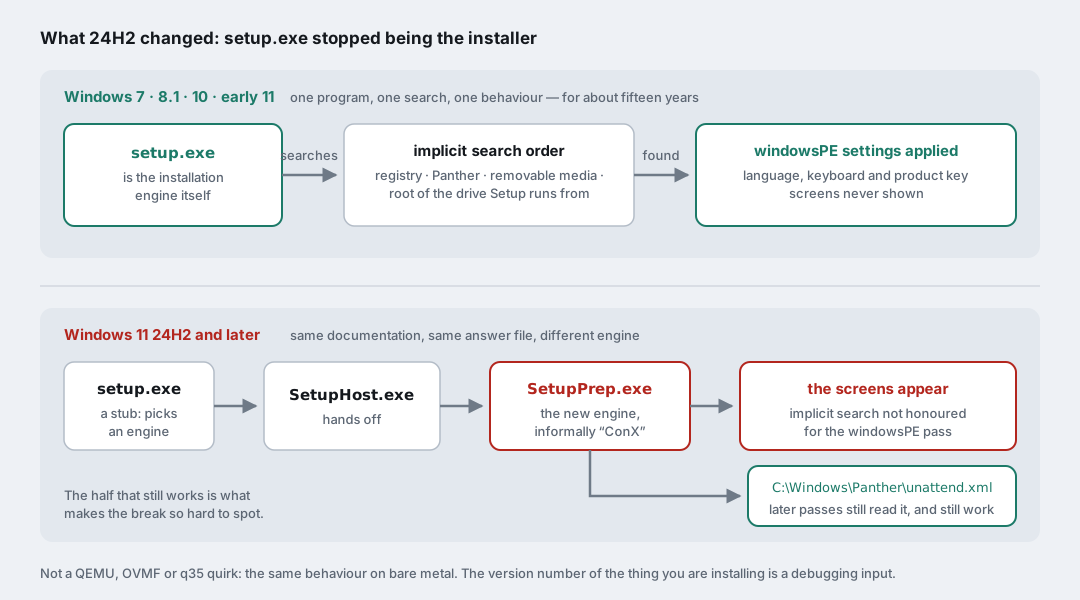
Fussy, specifically, in a way that matches my symptom exactly. The new engine still applies the later passes correctly — specialize, oobeSystem, everything that happens after the image has landed on disk, because by then the answer file has been copied into C:\Windows\Panther\unattend.xml and is being read by a completely different component. What it does not do reliably is honour the implicit search for the windowsPE pass — the one pass whose entire job is to decide whether a human gets asked anything.
Which is why my file half-worked: read by the part of Windows that still reads answer files the old way, skipped by the part that had been quietly replaced.
Where the fault actually lies
This is not a QEMU quirk. Not an OVMF quirk, not a q35 quirk, not something about virtual CD-ROMs versus real ones. I spent hours on that assumption — swapping bus types, toggling removable flags, hunting for a firmware setting — and wasted all of them: the behaviour is identical on bare metal. It is a change in Windows.
And it is the kind of change that hurts most: a silent behavioural break in a workflow that has been stable for fifteen years. Deployment scripts written before 24H2 do not fail loudly when you refresh the installation media. They fail halfway. The advanced parts still work, which is what makes it hard to diagnose: every instinct says “the file is being read, so the problem is my windowsPE section”, and you rewrite a section that was correct all along.
There is a community workaround. You can force the legacy engine by injecting a registry value — HKLM\SYSTEM\Setup\CmdLine — into the boot.wim image before the VM ever boots. It works. It also means mounting a WIM offline, loading a registry hive out of it, editing it, unloading it cleanly and repacking, every single time you refresh your installation media. That is a lot of delicate machinery to keep an old code path alive, and it will not get less deprecated over time.
So I didn’t do that.
Stop arguing with Setup
The fix came from changing the question: not how do I make Windows Setup read my answer file properly? but why am I letting Windows Setup run at all?
That is the design philosophy behind Christoph Schneegans’ open source unattend generator (schneegans.de/windows/unattend-generator, source at cschneegans/unattend-generator). The author states plainly that the files it produces work with any version of Windows 10 and 11, including 24H2, 25H2 and 26H2, in both ConX and legacy setup modes — with no registry surgery required.
That claim is only possible if the file sidesteps the broken mechanism entirely. It does.
Open a generated autounattend.xml and the windowsPE pass is not a tidy little <ImageInstall> block. It is dozens of RunSynchronousCommand entries in sequence, and what they are building, line by line, is a batch file: X:\pe.cmd. Then they run it. And pe.cmd performs the entire installation by hand:
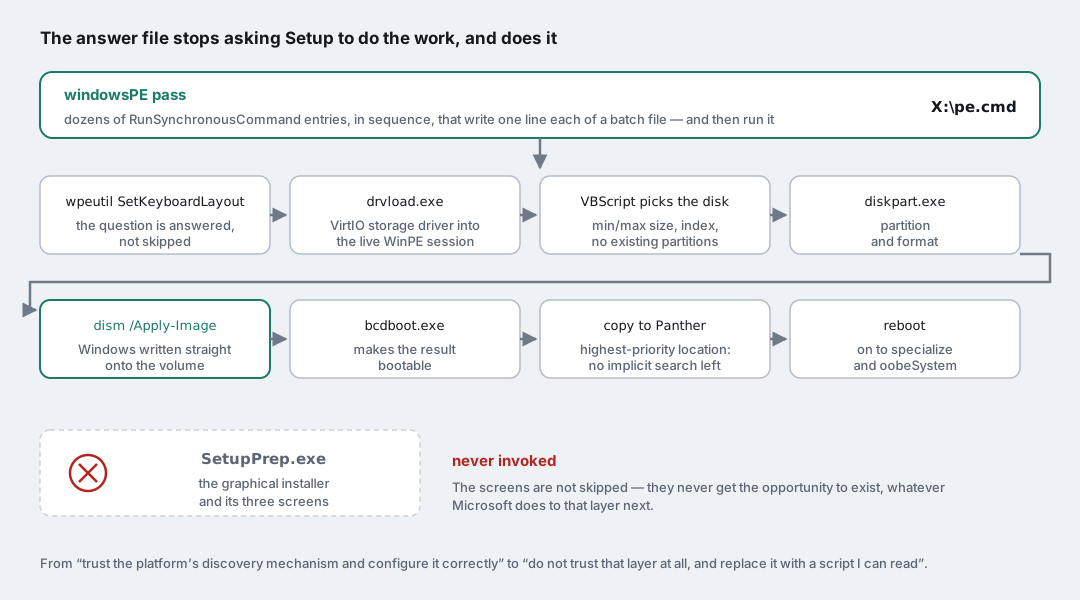
wpeutil.exe SetKeyboardLayout— the keyboard screen is not skipped, it is answered, before it can be asked.drvload.exe— the VirtIO storage driver is loaded into the live WinPE session, so the disk exists. No “Load Driver” dialog, no browsing to a CD.- a small VBScript picks the target disk against configurable criteria: minimum and maximum size, index, absence of existing partitions.
diskpart.exepartitions and formats it.dism.exe /Apply-Imagewrites the Windows image straight onto the volume. This is the load-bearing line: the job the graphical installer exists to do, done directly.bcdboot.exemakes the result bootable.- the answer file is copied to
Windows\Panther\unattend.xmlso the later passes find it in the highest-priority location — no implicit search involved, nothing left to chance. - and the machine is told to reboot.
The graphical installer is never invoked. SetupPrep.exe never runs. The language screen, the keyboard screen, the product key screen do not get skipped — they never get the opportunity to exist.
A change of stance worth stealing: from trust the platform’s discovery mechanism and configure it correctly to do not trust that layer at all, and replace it with a script I can read. The result is not merely fixed for 24H2 — it no longer depends on that layer having any behaviour at all.
Generating the file without the web form
There is a web form, and it is excellent. The whole thing is also a .NET class library, so the file can be generated from code and kept under version control:
1
2
brew install dotnet          # the formula, not the cask — no sudo required
git clone https://github.com/cschneegans/unattend-generator.git
Then a small console project referencing UnattendGenerator.csproj, calling generator.GenerateXml(Configuration.Default with { ... }) — the same pattern as Example.cs in the repository. The configuration model is properly typed: local accounts, Windows edition with its matching generic key, time zone, hardware and network requirement bypasses, automatic VirtIO driver installation, and a long tail of cosmetic tweaks.
Four things caught me out:
The default minimum disk size is 100 GiB. GeneratedTargetDiskSettings() ships with Constants.TargetDiskMinSizeGiB set to 100, and my test VM had an 80 GB disk. pe.cmd stopped with No disk satisfied the given criteria. — a much better failure than installing onto the wrong disk. Pass MinSizeGiB: 20 explicitly for small disks.
There are two flavours of autologon and they are not interchangeable. OwnAutoLogonSettings() logs in as the local account you just created; BuiltinAutoLogonSettings() logs in as the built-in Administrator. Read that line twice before you wonder why your user’s FirstLogonCommands never ran.
Leaving WifiSettings at its default leaves one screen standing. The default is InteractiveWifiSettings, and without explicitly hiding the wireless setup in OOBE you get Let’s connect you to a network at the end of an otherwise untouched installation. On my first successful run that cost me one manual intervention — two Tabs and Enter to pick “I don’t have internet” — a configuration I hadn’t finished rather than a limit of the mechanism.
VirtIoGuestTools: true replaces your own hand-written command. The library already ships a script that hunts virtio-win-guest-tools.exe across every drive letter from D to Z and installs it silently at first logon. Mine did the same thing, worse.
Rebuilding a Windows ISO that still boots
Putting the file at the root of the ISO means rebuilding the ISO, and a Windows installation ISO is not a friendly object. Hybrid BIOS + UEFI boot via El Torito, a UDF/ISO 9660 bridge structure, and an install.wim larger than 4 GiB.
The obvious approach fails, and fails politely, which is worse:
1
xorriso -indev win11.iso -outdev new.iso -boot_image any replay    # don't
That produces an ISO. The ISO does not boot. The EFI boot image on a Windows ISO is marked hidden, xorriso cannot recover its size, and the “replay” of the boot configuration silently comes out wrong — which you find out at the next power-on, long after you have stopped suspecting the ISO.
What works is unglamorous: extract everything, add the file, build a new image from scratch.
1
2
3
4
5
6
7
8
9
10
# 7z handles the UDF structure properly; xorriso -osirrox extracted a single
# file instead of the tree on this particular ISO
sudo 7z x -o/mnt/win11extract /var/lib/libvirt/images/win11.iso -bd -y
sudo cp autounattend.xml /mnt/win11extract/autounattend.xml

cd /mnt/win11extract
sudo genisoimage -iso-level 4 -l -R -udf -D -N -relaxed-filenames -allow-limited-size \
  -no-emul-boot -eltorito-boot boot/etfsboot.com -boot-load-size 8 \
  -eltorito-alt-boot -no-emul-boot -eltorito-boot efi/microsoft/boot/efisys_noprompt.bin \
  -V "WIN11AUTO" -o /var/lib/libvirt/images/win11-02-autounattend.iso .
Both El Torito boot images — boot/etfsboot.com for BIOS, the efisys*.bin family for UEFI — are already inside any modern Windows ISO. You point at them by relative path after extraction; nothing has to be generated.
Two small traps in that command line, each of which cost me a few minutes:
-allow-limited-sizeis mandatory. Without itgenisoimagehitsinstall.wim, decides that a file over 4 GiB cannot be represented, and aborts.-udfmust be lowercase. Typing-UDFgets youinvalid option -- 'F', which is a spectacularly unhelpful way to say “wrong case”.
The last keypress was the first one
With all of that in place, exactly one manual step remained, and it was the very first one: Press any key to boot from CD or DVD. Over a long SSH chain that prompt is a race you usually lose: miss the window and you land in the TianoCore boot manager, navigating a firmware menu one keystroke at a time across the internet.
The fix is two changes, and they have to be made together. The first one alone makes things worse.
One: use efisys_noprompt.bin instead of efisys.bin as the EFI El Torito image, as in the command above. It is already present in every modern Windows ISO — it is the variant intended for automated WDS-style deployment — and it boots from the CD without asking anything.
Two: invert the boot order in the libvirt domain, so the disk comes before the CD. This is the counter-intuitive half, and skipping it produces a magnificent bug.
Without the prompt, the CD wins every boot, not just the first one. And a Windows installation reboots several times on its way to a desktop. So with the “obvious” order — CD first, disk second — the machine would get most of the way through specialize, reboot as designed, boot the CD again, run pe.cmd again, and repartition the disk it had just spent ten minutes installing onto. An infinite loop that looks, from outside, like an installation that is taking a suspiciously long time.
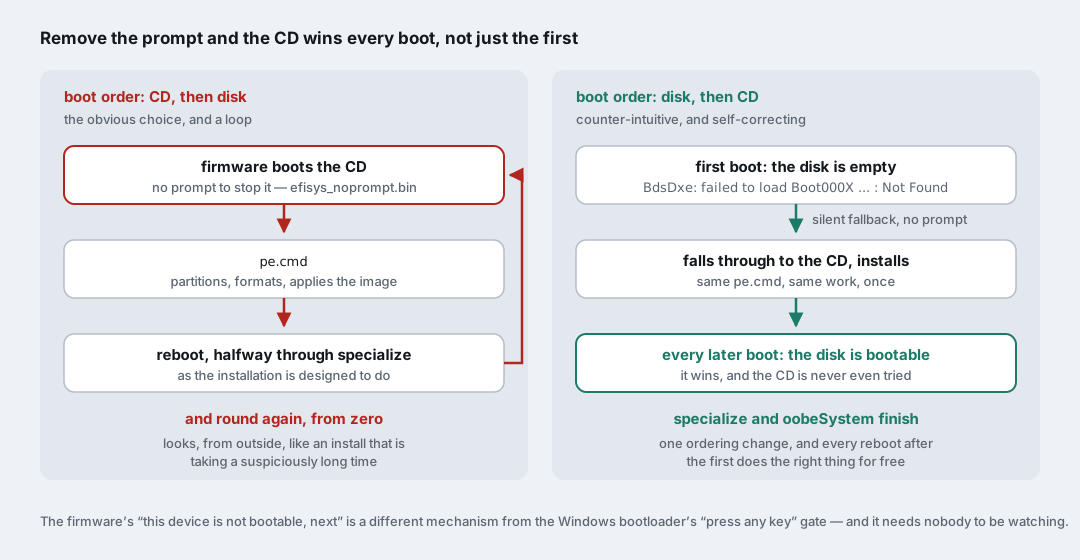
With the disk first, the sequence sorts itself out. On the very first boot the disk is empty, so the firmware fails on it — silently, instantly, with nothing more than BdsDxe: failed to load Boot000X ... : Not Found in the log — and falls through to the CD. That firmware-level fallback is a different thing entirely from the Windows bootloader’s “press a key” gate: no prompt, no timeout, no window to miss. Once Windows is installed and the disk is bootable, the disk wins every subsequent boot and the CD is never even attempted.
One ordering change, and every reboot after the first does the right thing for free.
Getting 470 MB into a VM that has no network yet
A postscript, because it is the next thing you hit.
A freshly provisioned VM has neither SSH nor RDP — deliberately, since enabling them is a later step. The only channel into it is the QEMU guest agent: guest-file-open, guest-file-write, guest-file-close, base64 in, file out. I needed to push a ~470 MB installer through it.
Large chunks do not fail, they hang — and they take the agent with them. At 256 KB to 4 MB per write, the call times out, and from that moment the guest agent inside the VM is gone. Not slow: gone. A bare guest-ping gets nothing back. The only recovery I found was rebooting the guest. Whatever that path does internally, it wedges the service rather than returning an error.
And there is a second, tighter ceiling you will meet first. virsh qemu-agent-command passes the whole command as a process argument, and libvirt imposes its own limit on the RPC message size — Unable to encode message payload, at 4 MB chunks, before the guest agent has been given a chance to have an opinion. Switching to the Python bindings gets you past the shell’s argv limit but not past libvirt’s.
The working answer is small chunks and short timeouts: 48 KB per write, with a timeout tight enough that a wedge announces itself immediately instead of ten minutes later. 471 MB went across in 47 seconds, verified byte-for-byte by SHA256 on both sides.
One more, free of charge: a WiX Burn installer launched through guest-exec can report 0x800705B4 (ERROR_TIMEOUT) while having installed perfectly. Burn bundles relaunch and elevate themselves internally, and the process the guest agent is watching detaches from the real worker before it finishes. Don’t trust the exit code of a Burn binary; go and ask the artefact whether it exists.
With hindsight, I should not have used that channel at all
I did not choose the guest agent, I reached for it. The VM had just come up, SSH and RDP were not enabled yet, and the agent was the one channel I had already verified working — I was driving guest-exec through it anyway. Inertia, not evaluation.
Two better answers, depending on when you know what the machine needs.
If you know before the VM exists, put the file on the installation ISO, in an $OEM$ folder: $OEM$\$1\Software\.... The generated pe.cmd copies that tree onto the target disk during provisioning itself — that is what UseConfigurationSet is for — so the file is already in C:\Software at first logon. No extra device, no transfer step, no guest agent call, and free, since the ISO is being rebuilt anyway.
If the need shows up afterwards — which is what happened to me, because the packages to install were being handed to me one at a time — build a small ISO containing just that file and attach it as a second CD-ROM with virsh attach-disk ... --type cdrom. Exactly the same mechanic as the VirtIO driver CD earlier in this post. The file appears as a drive inside Windows, instantly, with no chunking and no way to wedge anything. Do check the bus: a SATA CD-ROM wants the guest shut down first, which is still far cheaper than what I actually did.
None of this is the guest agent’s fault. It is an excellent channel for a command, a short script, or asking a freshly built machine what its IP address is when nothing else can reach it. It is not a file transport, and I used it as one because it was the tool already in my hand.
Fourteen and a half minutes
The final run: destroy the VM, recreate the disk, rebuild the ISO, define the domain with the inverted boot order, start it, and wait. From nothing to a working desktop with networking and the guest agent verified — 14 minutes and 30 seconds, and zero keystrokes. The run before that, with the Wi-Fi screen still unconfigured and dotnet being installed along the way, took 24 minutes and 33 seconds and one press of Enter.
Against a first day measured in hours and ending with a language selection screen, that feels like a fair trade.
The number that matters more than the minutes is the other one: zero. The run is now a handful of commands anybody can paste in order — generate the file, rebuild the ISO, define the domain, start it — with no window to catch, no menu to navigate, and no moment where the person at the keyboard has to know what Setup is about to ask. That was the point of the practice VM.
What I would tell myself on day one
- When something half-works, the “half” is the diagnosis. One file, honoured by the later passes and ignored by the first, means two mechanisms — so stop editing the file and go find out who reads it.
- Verify presence before you theorise about parsing. Shift+F10 in WinPE,
diskpart,dir, a hash. Five minutes, and it eliminates every “is the medium right” theory at once. - Check what the platform changed before assuming your platform is at fault. I blamed QEMU, OVMF and q35 in turn. It was a Windows build. The version number of the thing you are installing is a debugging input.
- Documented behaviour has a date on it. The implicit search order is still in the docs and still accurate for the legacy engine. It just isn’t the whole truth any more.
- When a discovery mechanism you don’t control keeps failing, consider not using it.
dism /Apply-Imagefrom a script you can read beats a GUI you can only hope will skip itself. - An automation that removes a prompt changes every boot, not just the first. Take the extra minute to ask what the new behaviour means for reboot number three.
- Chunk sizes are a protocol decision. 48 KB moved 471 MB in 47 seconds; 4 MB moved nothing and killed the agent.
- An installer’s exit code is a claim, not a fact. Check the artefact.
The whole thing is one generated XML file, one genisoimage line and one reordered pair of <boot> elements. Two days to find out which.